binfalse
Automagically add Accessibility Modifiers to Typescript Projects
May 16th, 2025
Today, I want to share a powerful tool that can help you introducing the eslint rule @typescript-eslint/explicit-member-accessibility into your projects.
This rule ensures that all class members (methods, properties, accessors) have explicit accessibility modifiers (public, private, or protected).
If you have a large codebase, manually adding these modifiers will be quite a daunting task.
But fear not, for this script is there to help! :D
The Challenge
Enabling eslint’s @typescript-eslint/explicit-member-accessibility rule in a large codebase very likely unleashes a lot of linter errors.
Manually fixing these errors will drain your time and energy.
The script I’m sharing today automates this process. The core of it goes through all matching scripts in your project. It uses ts-morph to traverse the AST of a script and adds an explicit accessibility modifier (can be specified with cli arguments) if they do not already have one:
sourceFiles.forEach((sourceFile) => {
  sourceFile.forEachDescendant((node) => {
    if (
      node.getKind() === SyntaxKind.MethodDeclaration ||
      node.getKind() === SyntaxKind.PropertyDeclaration ||
      node.getKind() === SyntaxKind.GetAccessor ||
      node.getKind() === SyntaxKind.SetAccessor
    ) {
      const declaration = node as MethodDeclaration | PropertyDeclaration;

      const modifiers = declaration.getModifiers();
      const hasAccessibilityModifier = modifiers.some((modifier) =>
        ["public", "protected", "private"].includes(modifier.getText())
      );

      if (!hasAccessibilityModifier) {
        declaration.toggleModifier(accessibilityModifier);
      }
    }
  });
});
You will find the complete script at add-accessibility-modifier.ts or check the corresponding Gist.
Howtouse
First ensure you have ts-morph and ts-node installed in your project.
npm install ts-morph ts-node
Then you can invoke the script using npx, specifying desired options:
npx ts-node add-public-modifier.js -s "src/**/*.ts" -t "tsconfig.json" -a "private"
Options are:
-s,--sourcesGLOB: Specify the source files glob pattern (default:src/**/*.ts).-t,--tsconfigPATHSpecify the path to thetsconfig.jsonfile of your project (default:tsconfig.json).-a,--accessibilityMODIFIER: Specify the accessibility modifier to add (public,private,protected) (defaults topublic).
I hope you find this script as powerful and helpful as I do. Happy hacking, and may the clean code be with you!
SAP ABAP @ Home 2025
April 15th, 2025
This year I started on a new journey in the SAP biz. To get a better feeling for the SAP ecosystem, I wanted to experiment and mess around on my own. And to avoid disrupting others and to have full control without needing to ask for permissions, I decided to set up an SAP system locally. However, that turned out to be quite a challenge, especially when aiming for a proper (v)host setup. After numerous attempts, I eventually found a reliable way using Docker. Here’s a rough guide based on my experience.
Prerequisites
Before diving into the setup, ensure you’re properly equipped with all technical requirements:
- Disk Space: At least 100GB, but I’d recommend 200+GB.
- RAM: They suggest 32GB. I have 250GB, and it’s been running smoothly ;-)
- CPU: A couple of fast cores.
- Time: Everything SAP related requires patience and time.
Step 1: Start the SAP System using Docker
The easiest way to get started is by using the Docker image provided by SAP. You’ll find it at the docker hub sapse/abap-cloud-developer-trial. Before you can spawn a container, you should increase a couple of system limits by running the following as root:
sysctl -w kernel.shmmni=32768
sysctl -w fs.aio-max-nr=18446744073709551615
sysctl -w vm.max_map_count=2147483647
Then, as described on the docker hub readme, run the following command to start a container:
docker run --stop-timeout 3600 -it --name a4h -h vhcala4hci -p 3200:3200 -p 3300:3300 -p 8443:8443 -p 30213:30213 -p 50000:50000 -p 50001:50001 sapse/abap-cloud-developer-trial:ABAPTRIAL_2022_SP01
Give it time. A lot of time… At some point it will tell you that it’s ready by printing something along those lines:
*** All services have been started. ***
***
*** To stop and be able to safely start again use Ctrl-C
*** Or use the stop command with timeout: docker stop -t 7200 ...
***
*** Have fun! ***
Step 2: Setting Up a Virtual Box with the SAP GUI
While I believe it would be possible to install the SAP GUI directly on your host, I recommend using a virtual environment to guard your host system. From my experiments I learned that SAP software loves to mess around in your file system and it will be virtually impossible to clean that up..
- Create a VM: I used a Debian virtual box for this purpose.
- Install Java: I’ve been successful with OpenJDK 17.
- Download SAP GUI for Java: Get it from SAP’s trial .
- Install on the VM: Copy the downloaded rar archive to your virtual machine, unpack it (eg. using unrar) and run the JAR file to start the installation:
java -jar PlatinGUI-Linux-x86_64-7.80rev7.jar - Start SAP GUI:
cdinto the install location (probably~/SAPClients/SAPGUI/bin) and run:./guistart /H/x.x.x.x/S/3200Replace
x.x.x.xwith the IP address that resolved to your host machine. Depending on your VM config, it might be something like10.0.2.2(VBox NAT) or maybe something starting with192.168....
Step 3: Updating the License
Follow the procedure from the Docker Hub to update the license:
- Login on client
000asSAP*with the passwordABAPtr2022#01. - Run Transaction
SLICENSE. - Get a license from minisap. Choose
A4H, fill the form, and download the license. - Back in the
SLICENSEtransaction in SAP GUI, click install and choose the downloaded file. - Log off from the
SAP*account (System -> Logoff) and start a new SAP GUI session. Login on client001asDEVELOPERwith the same passwordABAPtr2022#01.
And that’s it! You should now have a locally running SAP system.
I recommend to stop the docker container using docker stop -t 7200 a4h and then commit the changes into a new image, ie.
docker commit a4h my-sap
Afterwards you can spawn a container of the my-sap image, properly setup with a valid license and stuff, even if you accidentally clean the old container.
This setup should allow you to experiment and develop in a controlled environment without affecting a main system. Happy coding <3
Avoiding Pitfalls with Quotation Marks in Docker Compose Environment Variables
May 31st, 2024
When working with Docker Compose, setting environment variables is a common task. However, the way you format these variables can lead to unexpected issues, especially when dealing with quotation marks. In this post, we’ll explore a recent challenge I faced with the uptime monitoring tool Gatus and provide best practices to avoid similar problems.
The Problem
I recently tried to set up Gatus using Docker Compose. My initial docker-compose.yml looked something like this:
services:
  gatus:
    container_name: gatus
    image: twinproduction/gatus:latest
    restart: unless-stopped
    ports:
      - "88:8080"
    environment:
      - GATUS_CONFIG_PATH="/config"
However, Gatus failed to locate the configuration files at /config. After some troubleshooting, I found that the issue was with the quotation marks around the environment variable value. Removing the quotation marks resolved the problem:
services:
  gatus:
    container_name: gatus
    image: twinproduction/gatus:latest
    restart: unless-stopped
    ports:
      - "88:8080"
    environment:
      - GATUS_CONFIG_PATH=/config
Understanding the Issue
Docker Compose uses YAML for configuration, and YAML handles quotation marks in a specific way. When you enclose a value in quotation marks, those quotes become part of the value. In the case of a minimal Docker image like Gatus, which is built from scratch, the shell interprets these quotes literally, causing it to fail to find the intended path:
- With quotes:
GATUS_CONFIG_PATH="/config"
sets the variable to the literal string"/config", including the quotes. - Without quotes:
GATUS_CONFIG_PATH=/config
sets the variable to the string/config, as intended.
Docker Compose Environment Variables
Array Format vs. Key-Value Pairs Format
Docker Compose allows environment variables to be defined in two ways:
Array Format
   environment:
     - MY_VAR=value
     - MY_OTHER_VAR="another value"
Key-Value Pairs Format
   environment:
     MY_VAR: value
     MY_OTHER_VAR: "another value"
When to Use Quotation Marks
- Without Quotation Marks:
For simple strings without spaces, special characters, or reserved YAML characters, omit the quotes:
MY_VAR: value - With Quotation Marks:
Use quotes for values with spaces or special characters to ensure proper parsing:
MY_OTHER_VAR: "another value"
Recommendations
Prefer Key-Value Pairs Format
The key-value pairs format is more readable and avoids some of the parsing issues associated with the array format.
   services:
     myservice:
       environment:
         MY_VAR: value
         MY_OTHER_VAR: "another value"
Use Quotes Judiciously
Only use quotes when necessary to ensure correct parsing and avoid including them in the actual value.
   MY_VAR: simple_value
   MY_OTHER_VAR: "value with spaces"
Conclusion
Quotation marks can lead to subtle issues when setting environment variables in Docker Compose, especially with minimal Docker images like Gatus. By understanding how YAML handles these values and following best practices, you can avoid these pitfalls and ensure your services run smoothly.
vdirsyncer auth failures with baikal
May 27th, 2024I am using Baïkal as Cal- and CardDAV server.
Today I tried to sync the calendars using vdirsyncer, but it failed to connect to my baikal server always giving me auth errors like that:
$ vdirsyncer discover
Discovering collections for pair my_calendars
martin_cal_local:
warning: Failed to discover collections for martin_cal_remote, use `-vdebug` to see the full traceback.
error: Unknown error occurred: 401, message='Unauthorized', url=URL('https://example.de/dav.php')
error: Use `-vdebug` to see the full traceback.
Also from the -vdebug messages I could not make sense of it, but eventually NICO’S BLOG pointed into the correct direction:
vdirsyncer is simply no able to do the digest auth… (and probably will never implement the deprecated standard)
So the solution is to change that to basic auth in baikal’s settings.
Thanks Nico, whoever you are :)
GChat login-cookie generator for mautrix' puppeting bridge
August 8th, 2023At work we’re using Google Workspace to manage ourself. However, I do have a couple of reservations against those kinds of software. Especially on my google-free mobile I am not able to use it - and thus could not chat with the team on-the-go without Matrix and mautrix’ Google Chat puppeting bridge 🤩
The Problem
It seems Google recently altered authentication, which caused the bridge to adapt and consequently I need to frequently re-authenticate the bridge. In addition, the process of authentication became significantly more complicated: You’d need to login to you google account with some browser, then open the browser’s dev tools to access the cookie data and extract a couple of special cookies in the correct Google domain to create a custom JSON object for the bridge, see the full authentication instructions. However, that causes far too much load in my brain, urging automation!
The Solution
The solution should be able to read Google’s cookies and should technically be realisable in just a couple of hours… Thus, a little web seemed to be the most obvious solution: it runs in the browser and it’s pretty simple to read the cookies of some domain.
Thus, I developed a little web extension that is already available for both Firefox and Chromium based browsers.
The code is available at the Matrix-GChat Bridge Login Cookie Generator repository on GitHub and pretty simple.
The web extension basically consists of only the popup part with an icon sitting in the browsers toolbar.
Just imagine the popup as a very simple HTML web page with a little touch of JavaScript sugar.
It basically asks the browser for all the cookies for the URL https://chat.google.com
function getAllCookies() {
    if (typeof browser === "undefined") {console.log('trying chrome...')
        return chrome.cookies.getAll({url: "https://chat.google.com"})
    } else {
        return browser.cookies.getAll({url: "https://chat.google.com"});
    }
}
Those cookies are then iterated to collect the relevant ones for the login-cookie command in a LoginCookie data structure.
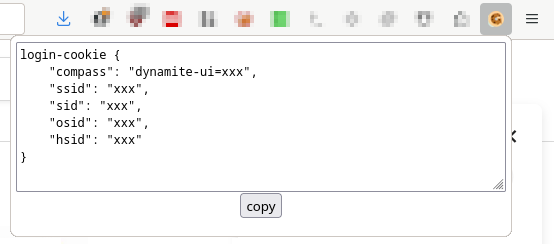
If it managed to find all the necessary cookies, the corresponding login-cookie string can be generated:
    getCookie() {
        return `login-cookie {
    "compass": "${this.compass}",
    "ssid": "${this.ssid}",
    "sid": "${this.sid}",
    "osid": "${this.osid}",
    "hsid": "${this.hsid}"
}`
    }
and it will be revealed in a text area that get dynamically injected into the popup’s page, together with a little button that will copy the contents of the textarea once clicked:
    button.onclick = function () {
        navigator.clipboard.writeText(loginCookieArea.value).then(
            () => {
                console.log('clipboard successfully set');
            },
            () => {
                console.error('clipboard write failed');
            }
        );
        return false;
    };
Thus, you only need to click the icon in some browser where you’re authenticated to the Google chat and the popup will give you the necessary login-cookie \o/
The Publication
Building the web extension is a breeze: just zip a couple of files :)
I’ve even automated the process with a nifty script.
The real journey was the publication process with Mozilla’s AddOn Directory and the Chrome WebStore.
Initially, I developed the extension on my Debian-based Firefox, which only supported web extensions in version 2.
But there’s a twist - Chromium dropped full support for version 2…
Thus, you will find two manifests in the repository…
The next challenge was the publication itself. It’s all nice and complicated, especially in the chrome web store maze. I submitted the first round of the extension and for review at both platforms. You know it from emails: once sent you see the parts that could need a bit of polishing. So I improved the extension, build pipelines etc and wanted to resubmit a new version. AMO played nice, allowing re-submissions, but Chrome WebStore only allows one submission at a time - frustrated I needed to wait for the review results before creating a new version. The next day, AMO listed the most recent version of the extension it took another day for the Chrome review. In total it took 5 days to get it published at the Chrome WebStore. Not sure why the reviews take so long over there…? Perhaps extra scrutiny? Would actually doubt that, though…