binfalse
Common Name vs Subject Alternative Names
May 19th, 2017You probably heard about the conflict between the fields Common Name (CN) and Subject Alt Names (subjectAltName) in SSL certificates.
It seems best practice for clients to compare the CN value with the server’s name.
However, RFC 2818 already advised against using the Common Name and google now takes the gloves off.
Since Chrome version 58 they do not support the CN anymore, but throw an error:
Subject Alternative Name Missing
Good potential for some administrative work ;-)
Check for a Subject Alternative Names
You can use OpenSSL to obtain a certificate, for example for binfalse.de:
openssl s_client -showcerts -connect binfalse.de:443 </dev/null 2>/dev/nullHere, openssl will connect to the server behind binfalse.de at port 443 (default port for HTTPS) to request the SSL certificate and dump it to your terminal.
openssl can also print the details about a certificate. You just need to pipe the certificate into:
openssl x509 -text -nooutThus, the whole command including the output may look like this:
openssl s_client -showcerts -connect binfalse.de:443 </dev/null | openssl x509 -text -noout
Certificate:
  Data:
    Version: 3 (0x2)
    Serial Number:
      03:a1:4e:c1:b9:6c:60:61:34:a2:e1:9f:ad:15:2b:f9:fd:f0
  Signature Algorithm: sha256WithRSAEncryption
    Issuer: C = US, O = Let's Encrypt, CN = Let's Encrypt Authority X3
    Validity
      Not Before: May 12 07:11:00 2017 GMT
      Not After : Aug 10 07:11:00 2017 GMT
    Subject: CN = binfalse.de
    Subject Public Key Info:
      Public Key Algorithm: rsaEncryption
        Public-Key: (4096 bit)
        Modulus:
          00:ae:8d:6a:74:0b:10:4e:8e:07:1e:c8:3e:b8:83:
          11:4f:b0:af:2b:eb:49:61:82:4f:6f:73:30:0c:d6:
          3e:0a:47:bc:72:55:df:84:8c:56:1a:4a:87:ec:d4:
          72:8d:8c:3d:c4:b3:6c:7a:42:e2:f4:6e:c0:5e:50:
          e4:c0:9c:63:6c:0b:e0:12:15:0c:28:2d:4f:67:ad:
          69:9a:b4:ee:dc:12:b1:02:83:00:b7:22:22:60:13:
          a6:7d:e3:8a:e5:0c:f3:15:17:69:5e:fe:de:af:ea:
          1e:71:b4:90:df:97:fe:d2:1b:ef:58:d5:43:35:8b:
          81:e1:62:d6:6b:eb:18:e5:5b:a8:5c:da:f8:39:be:
          8b:9a:34:c1:54:d2:5c:bc:22:85:6b:2e:30:8c:d8:
          fa:dd:2c:9d:ae:5e:c9:21:43:86:d5:f8:dc:aa:d6:
          d4:2c:a8:0b:ca:d8:16:cb:98:d3:c9:c8:c0:a3:6c:
          1e:2f:9d:6f:5b:d3:09:1f:4e:1b:a7:48:99:25:84:
          ef:5f:5a:db:c1:19:82:fd:8c:9e:b2:68:da:1b:98:
          b8:60:49:62:82:8e:75:ea:03:be:0d:df:e1:8c:40:
          8a:10:48:f4:c0:f8:89:02:29:9b:94:3f:6d:68:72:
          42:e8:2e:ad:e6:81:cd:22:bf:cd:ff:ce:40:89:73:
          2e:1e:b7:94:3f:f1:9e:36:89:37:4a:04:81:80:70:
          8f:39:fe:b2:90:b5:5e:cb:93:7e:71:e3:e1:2a:bc:
          21:9a:ef:a6:e2:2b:1c:8c:da:53:bf:79:37:7d:6e:
          0e:eb:de:c3:aa:9f:64:f6:c9:58:35:d2:32:ab:4f:
          f7:8d:6e:a1:7f:7a:de:d4:48:cd:0d:18:b7:20:84:
          b5:8c:d8:f5:b1:ac:e3:b4:66:9f:9f:ab:01:22:c8:
          f2:f8:09:36:f1:c5:90:ff:d3:a4:80:8e:f4:c4:05:
          c5:4f:7f:ca:f3:fd:42:ec:25:b7:38:42:af:fd:37:
          da:5e:2f:a8:c4:23:fe:24:d2:72:16:1e:96:50:45:
          05:cb:39:6c:95:69:a0:39:48:73:72:a4:d5:c0:a0:
          b3:9a:cb:27:fe:7c:87:b8:53:3b:52:50:b6:5d:11:
          ea:b5:42:1a:80:07:4d:4c:b4:79:59:7c:b9:4b:2f:
          0b:b4:2e:57:a6:6c:5f:45:c6:4d:20:54:9d:e3:1b:
          82:0c:16:65:a0:fa:e9:cb:98:6d:59:3c:a5:41:22:
          22:e8:38:38:b6:fe:05:d5:e5:34:7f:9e:52:ba:34:
          4c:ab:9b:8d:e0:32:ce:fa:cd:2b:a3:57:7a:2c:fc:
          2c:e7:31:00:77:d7:d1:cd:b5:d2:6a:65:0f:97:63:
          b0:36:39
        Exponent: 65537 (0x10001)
    X509v3 extensions:
      X509v3 Key Usage: critical
        Digital Signature, Key Encipherment
      X509v3 Extended Key Usage:
        TLS Web Server Authentication, TLS Web Client Authentication
      X509v3 Basic Constraints: critical
        CA:FALSE
      X509v3 Subject Key Identifier:
        3B:F7:85:9A:2B:1E:1E:95:20:1B:21:D9:2C:AF:F4:26:E8:95:29:BA
      X509v3 Authority Key Identifier:
        keyid:A8:4A:6A:63:04:7D:DD:BA:E6:D1:39:B7:A6:45:65:EF:F3:A8:EC:A1

      Authority Information Access:
        OCSP - URI:http://ocsp.int-x3.letsencrypt.org/
        CA Issuers - URI:http://cert.int-x3.letsencrypt.org/

      X509v3 Subject Alternative Name:
        DNS:binfalse.de
      X509v3 Certificate Policies:
        Policy: 2.23.140.1.2.1
        Policy: 1.3.6.1.4.1.44947.1.1.1
          CPS: http://cps.letsencrypt.org
          User Notice:
            Explicit Text: This Certificate may only be relied upon by Relying Parties and only in accordance with the Certificate Policy found at https://letsencrypt.org/repository/

  Signature Algorithm: sha256WithRSAEncryption
    1b:82:51:b3:1c:0d:ae:8c:9f:25:4e:87:1a:4b:e9:b4:77:98:
    74:22:f1:27:c5:c1:83:45:7c:89:34:43:fe:76:d8:90:56:c5:
    b1:a7:74:78:f1:e4:4c:69:2c:9f:55:d1:a3:c9:ce:f1:b6:4a:
    40:e4:18:ae:80:03:76:bd:d5:25:ff:4b:4b:68:cd:98:09:48:
    e4:42:07:bc:4a:ad:a3:f7:46:8a:fe:46:c2:6a:b2:28:01:4d:
    89:09:2a:31:15:26:c5:aa:14:93:5e:8c:a6:cb:30:af:08:7f:
    6f:d8:ef:a2:d7:de:33:3e:f2:c3:17:c6:08:4a:3b:c6:67:05:
    07:c0:b8:52:13:e1:c8:13:d4:0e:19:11:0f:54:4e:ea:d0:2b:
    c2:3d:93:51:8a:15:da:f7:4b:78:08:cd:c1:d0:f2:f7:e0:98:
    f7:0a:bc:13:ca:d0:9b:be:2d:2b:d5:e9:03:29:12:aa:97:ec:
    1a:d1:2c:51:7d:21:d1:38:39:aa:1d:9e:a5:98:1d:94:e2:66:
    ea:31:c4:18:b6:13:6c:6f:8e:2f:27:77:7b:af:37:e0:0b:86:
    4b:b5:cc:7b:96:31:0c:30:c6:9e:12:a2:15:07:29:9f:78:3e:
    5e:2a:3f:cf:f8:27:82:30:72:6b:63:64:5a:d1:2d:ed:08:ed:
    71:13:a9:0b
As you can see in the X.509 extension this server’s SSL certificate does have a Subject Alternative Name:
X509v3 Subject Alternative Name:
  DNS:binfalse.de
To quick-check one of your websites you may want to use the following grep filter:
openssl s_client -showcerts -connect binfalse.de:443 </dev/null | openssl x509 -text -noout | grep -A 1 "Subject Alternative Name"If that doesn’t print a proper Subject Alternative Name you should go and create a new SSL certificate for that server!
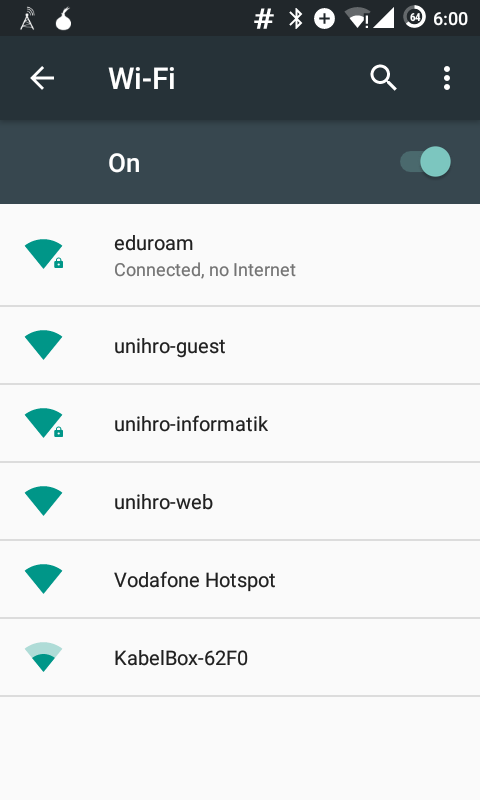
#android: No Internet Access Detected, won't automatically reconnect -aka- Connected, no Internet.
February 7th, 2017
Hands up: who knows what an android device does when it sees a WiFi network coming up?
Exactly, since Lollipo (Android 5) your phone or tablet leaks a quick HTTP request to check if it has internet access.
This check is, for example, done with clients3.google.com/generate_204, a “webpage” that always returns an HTTP status code 204 No Content.
Thus, if the phone receives a 204 it is connected to the internet, otherwise it assumes that this network does not provide proper internet access or is just a captive portal.
However, that way Google of course always knows when you connect from where. And how often. And which device you’re using. etc… :(
How to prevent the leak
Even if people may like that feature, that is of course a privacy issue – so how can we counter that?
I briefly mentioned that a few years ago.
You could use AdAway (available from F-Droid, source from GitHub) to redirect all traffic for clients3.google.com and clients.l.google.com to nirvana.
I already maintain a convenient configuration for AdAway at stuff.lesscomplex.org/adaway.txt, which blocks Google’s captive portal detection.
However, blocking that “feature” also comes with some drawbacks…
The downside of blocking captive portal detection
The consequences of blocking all request of the captive portal detection are obvious: your phone assumes that no network hat internet access. And therefore, it wouldn’t connect automatically, saying
No Internet Access Detected, won’t automatically reconnect. see image on top
That will probably increase your mobile data usage, as you always need (to remember) to do connect manually. And even if you manually connect to a network “without internet” the WiFi icon will get an exclamation mark and the phone says
Connected, no Internet. see second image
Annoying…
What can we do about it?
Disable captive portal detection
With a rooted phone you can simply disable captive portal detection. Just get a root-shell through adb (or SSH etc) to run the following command:
settings put global captive_portal_detection_enabled 0Changed as of Android 7, see update below!
One small drawback of that approach: you need to execute that again after flashing a new image… However, I guess you’ll anyway have a small workflow for re-flashing your phone – just add that tiny bit to it ;-)
Another drawback is that you loose the captive portal detection… Of course, that’s what you intended, but sometimes it may be useful to have that feature in hotels etc..
Change the server for captive portal detection with the Android API
You can also change the URL to the captive portal server to a server under your control.
Let’s say you have a site running at scratch.binfalse.de/generate_204 that simulates a captive portal detection server backend(!?) and always returns 204, no matter what request.
Then you can use that URL for captive portal detection!
Override the captive portal server on a root-shell (adb or SSH etc) by calling:
settings put global captive_portal_server scratch.binfalse.deChanged as of Android 7, see update below!
This way you retain the captive portal detection without leaking data to Google. However, you will again loose the setting when flashing the phone again..
Change the server for captive portal detection using AdAway
Another option for changing the captive portal detection server is to change its IP address to one that’s under your control.
You can do that with AdAway, for example.
Let’s say your captive portal detection server has the IP address 5.189.140.231, then you may add the following to your AdAway configuration:
5.189.140.231 clients3.google.com
5.189.140.231 clients.l.google.com
The webserver at 5.189.140.231 should then of course accept requests for the foreign domains.
This way, you also don’t leak the data to Google and you will also keep the settings after flashing the phone (as long as you leave AdAway installed).
However, there are also some things to keep in mind:
First, I could imagine that Google may be a bit upset if you redirect their domains to a different server?
And second, you don’t know if those are the only servers used for captive portal detection.
If Google at some point comes up with another domain for captive portal detection, such as captive.google.com, you’re screwed.
Supplementary material
See also the CaptivePortal description at the android reference.
Create captive portal detection server with Nginx
Just add the following to your Nginx configuration:
location /generate_204 { return 204; }Create captive portal detection server with Apache
If you’re running an Apache web server you need to enable mod_rewrite, then create a .htaccess in the DocumentRoot containing:
<IfModule mod_rewrite.c>
	RewriteEngine On
	RewriteCond %{REQUEST_URI} /generate_204$
	RewriteRule $ / [R=204]
</IfModule>
Create captive portal detection server with PHP
A simple PHP script will also do the trick:
<?php http_response_code (204); ?>UPDATE
As of Android 7 the settings have changes.
To enable/disable captive portal detection you need to set captive_portal_mode to either
0Don’t attempt to detect captive portals, see CAPTIVE_PORTAL_MODE_IGNORE.1When detecting a captive portal, display a notification that prompts the user to sign in, see CAPTIVE_PORTAL_MODE_PROMPT.2When detecting a captive portal, immediately disconnect from the network and do not reconnect to that network in the future, see CAPTIVE_PORTAL_MODE_AVOID.
To define the captive portal server you actually have three settings:
captive_portal_use_httpsshould the phone use HTTPS for captive portal detection? (0= HTTP,1= HTTPS)captive_portal_http_urlURL to the captive portal w/o HTTPS.captive_portal_https_urlURL to the captive portal when using HTTPS.
Docker MySQL Backup
February 6th, 2017Even with Docker you need to care about backups.. ;-)
As you usually mount all the persistent data into the container the files will actually be on your host. Thus, you can simply do the backup of these files. However, for MySQL/MariaDB I prefer having an actual SQL-dump. Therefore I just developed the Docker MySQL-Backup tool. You will find the sources at the corresponding GitHub repository.
How does Docker MySQL-Backup work?
The tool basically consists of two scripts:
- a config file in
/etc/default/docker-mysql-backupto setup the path for the backup location and the path to gzip, - the script
/etc/cron.daily/docker-mysql-backupwhich does the actual job.
The script /etc/cron.daily/docker-mysql-backup parses the output of the docker ps command to find running containers of the MySQL image.
More precisely, it looks for containers of images that start with either \smysql or \smariadb.
The actual filter command is
docker ps --format '{{.Names}}\t{{.Image}}' | /bin/grep '\s\(mysql\|mariadb\)' | awk '{print $1}'That of course only matches the original MySQL/MariaDB image names (if you have a good reason to derive an own version of that image please tell me!).
For every matching $container the script will exec the following command:
docker exec "$container" \
	sh -c 'exec mysqldump --all-databases -uroot -p"$MYSQL_ROOT_PASSWORD"' \
	| ${GZIP} -9 > "${BACKUP_DIR}/${NOW}_complete.sql.gz"
With the following variables:
$BACKUP_DIRis a concatenation of$BACKUP_BASE(configured in/etc/default/docker-mysql-backup) and the container name,$NOWis the current time stamp asdate +"%Y-%m-%d_%H-%M".
Thus, the backups are compressed, organised in subdirectories of $BACKUP_BASE, and the SQL-dumps have a time stamp in their names.
$BACKUP_BASE defaults to /srv/backup/mysql/, but can be configured in /etc/default/docker-mysql-backup.
Last but not least, the script also cleans the backups itself.
It will keep the backups of the last 30 days and all backups of days that end with a 2.
So you will keep the backups from the 2nd, the 12th, and the 22nd of every month.
As the script is stored in /etc/cron.daily/ the cron tool will execute the backup script on a daily basis.
Restore a dump
Restoring the dump is quite easy.
Let’s assume your container’s name is $container and the dump to restore carries the time stamp $date.
Then you just need to run:
docker exec "$container" -v "${BACKUP_BASE}/docker_${container}":/srv sh -c \
      'exec gunzip < /srv/${date}_complete.sql.gz | mysql -uroot -p"$MYSQL_ROOT_PASSWORD"'
This will mount the backup directory in /srv of the running container and then decompress and import the SQL-dump on the fly.
Installation
Manual installation through GitHub
Clone the Docker MySQL-Backup repository:
git clone https://github.com/binfalse/docker-mysql-backup.gitCopy the backup script to the cron.daily (most likely /etc/cron.daily/) directory on your system:
cp docker-mysql-backup/etc/cron.daily/docker-mysql-backup /etc/cron.daily/Copy the configuration to /etc/default/:
cp docker-mysql-backup/etc/default/docker-mysql-backup /etc/default/Installation from my Apt repository
If you’re running a Debian-based system you may want to use my apt-repository to install the Docker MySQL-Backup tool. In that case you just need to run
aptitude install bf-docker-mysql-backupAfterwards, look into /etc/default/docker-mysql-backup for configuration options.
This way, you’ll always stay up-to-date with bug fixes and new features :)
Automatically update Docker images
January 24th, 2017
Docker is cool. Jails tools into containers. That of course sounds clean and safe and beautiful etc. However, the tools are still buggy and subject to usual attacks, just as they were running on your main host! Thus, you still need to make sure your containers are up to date.
But how would you do that?
Approaches so far
docker-compose pull
On the one hand, let’s assume you’re using Docker Compose, then you can go to the directory containing the docker-compose.yml and call
docker-compose pull
docker-compose up -d --remove-orphans
However, this will just update the images used in that Docker Compose setup – all the other images on your system wouldn’t be updated. And you need to do that for all Docker Compose environments. And if you’re running 30 containers of the same image it would check 30 times for an update of that image – quite a waste or power and time..
dupdate
On the other hand, you may use the dupdate tool, introduced earlier:
dupdate -sIt is able to go through all your images and update them, one after the other.
That way, all the images on your system will be updated.
However, dupdate doesn’t know about running containers.
Thus, currently running tools and services won’t be restarted..
Better: Docker Auto-Update
Therefore, I just developed a tool called Docker Auto-Update that combines the benefits of both approaches.
It first calls dupdate -s to update all your images and then iterates over a pre-defined list of Docker Compose environments to call a docker-compose up -d --remove-orphans.
The tool consists of three files:
/etc/cron.daily/docker-updaterreads the configuration in/etc/default/docker-updaterand does the regular update/etc/default/docker-updaterstores the configuration. You need to set theENABLEDvariable to1, otherwise the update tool won’t run./etc/docker-compose-auto-update.confcarries a list of Docker Compose environments. Add the paths to thedocker-compose.ymlfiles on your system, one per line
As it’s installed in /etc/cron.daily/, cron will take care of the job and update your images and containers on a daily basis.
If your system is configured properly, cron will send an email to the systems administrator when it updates an image or restarts a container.
You see, no magic, but a very convenient workflow! :)
Installation
Manual
To install the Docker Auto-Update tool, you may clone the git repository at GitHub. Then,
- move the
./etc/cron.daily/docker-updaterscript to/etc/cron.daily/docker-updater - move the
./etc/default/docker-updaterconfig file to/etc/default/docker-updater - update the setup in
/etc/default/docker-updater– at least setENABLED=1 - create a list of Docker Compose config files in
/etc/docker-compose-auto-update.conf- one path to adocker-compose.ymlper line.
Debian Package
If you’re using a Debian based system you may install the Docker-Tools through my apt-repository:
aptitude install bf-docker-toolsAfterwards, configure /etc/default/docker-updater and at least set ENABLED=1.
This way, you’ll stay up-to-date with bug fixes etc.
Disclaimer
The tool will update your images and containers automatically – very convenient but also dangerous! The new version of an image may break your tool or may require an updated configuration.
Therefore, I recommend to monitor your tools through Nagios/Icinga/check_mk or whatever. And study the mails generated by cron!
Rsync of ZFS data with a FreeBSD live system
January 21st, 2017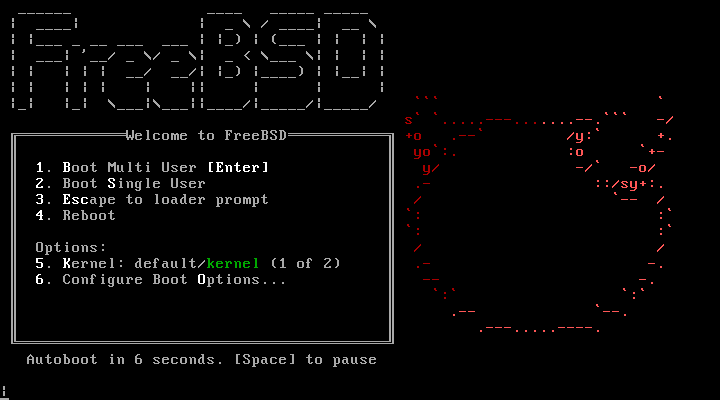
Let’s assume you rendered your FreeBSD system unbootable.. Yeah, happens to the best, but how can you still copy the data stored on a ZFS to another machine? You probably just shouted RSYNC - but it’s not that easy.
You would need a FreeBSD live os (either on a USB pen drive or on a CD/DVD) and boot into that system. However, by default you do not have network, the ZPool is not mounted, there is no rsync and SSH is not running, and the live os is not writable, which brings another few issues…
This is a step-by-step how-to through all the obstacles. Just boot into your live os (get it from freebsd.org) and go on with the following…
Get Networking
By default your live system does not have networking setup correctly.
Call ifconfig to see if the network interface is up. If it’s not you can bring it up using:
ifconfig em0 up(assuming your inteface is called em0)
If it is up, you need to configure it. When you’re using a DHCP server you can just ask for an IP address using:
dhclient em0Otherwise you need to configure the addresses manually:
ifconfig em0 inet 1.2.3.4 netmask 255.255.255.0Afterwards you should be able to ping other machines, such as
ping 8.8.8.8Mount the ZPool
Your ZPool won’t be mounted by default; you need to do it manually. To list all pools available on that machine just call:
zpool importThis searches through the devices in /dev to discover ZPools. You may specify a different directory with -d (see man page for zpool).
To actually import and mount your ZPool you need to provide its name, for example:
zpool import -f -o altroot=/mnt zrootThis will import the ZPool zroot. Moreover, the argument -o altroot=/mnt will mount it to /mnt instead of / and the -f will mount it even if it may be in use by another system (here we’re sure it isn’t, aren’t we?).
Create some Writeable Directories
The next problem is, that you do not have permissions to write to /etc, which you need to e.g. create SSH host keys etc.
However, that’s also not a big issue as we have the unionfs filesystem! :)
UnionFS will mount a directory as an overlay over another directory.
Let’s assume you have some space in $SPACE (maybe in the ZPool that you just mounted or on another USB drive), then you can just create a few directories:
mkdir $SPACE/{etc,var,usr,tmp}and mount it as unionfs to the root’s equivalents:
mount_unionfs $SPACE/etc /etc
mount_unionfs $SPACE/var /var
mount_unionfs $SPACE/usr /usr
mount_unionfs $SPACE/tmp /tmp
Now we can write to /etc, while the actual changes will be written to $SPACE/etc! Isn’t that a great invention?
Start the SSH service
Now that /etc is writable we can start caring about the SSH daemon.
First, we need to configure it to allow root to login.
Add the follwing line to the /etc/ssh/sshd_config:
PermitRootLogin yesThen, we can start the ssh daemon using:
service sshd onestartIt will automatically create host keys and all the necessary things for a first start of SSH.
If that was successful, port 22 should now be open:
# sockstat -4 -l
USER     COMMAND    PID   FD PROTO  LOCAL ADDRESS         FOREIGN ADDRESS
root     sshd       938   4  tcp4   *:22                  *:*
root     syslogd    542   7  udp4   *:514                 *:*
Set root Password
To be able to login you of course need to set a root password:
passwd rootAftwerwards, you should be able to login through SSH from any other machine. Go ahaed and give it a try!
Install and Run rsync
Almost there, but the freeBSD live image doesn’t come with rsync installed.
So we need to do it manually:
pkg install rsyncThis will first tell us that not even pkg is installed, but answering the question with y it will automatically install itself.
And as everything is mounted as UnionFS, the stuff will actually be installed to $SPACE/... instead of /.
However, you should now be able to do the rsync job from where ever you want :)