binfalse
Thunderbird opens multiple windows on startup
September 25th, 2016
Since some time my Icedove/Thunderbird (currently version 38.8.0) uses to open two main windows when I launch it. That’s a bit annoying, as there are always two windows visually trying to catch my attention. Even if I read the new mail in one of them the other one would still demand attention.
That’s of course a bit annoying. The preferences dialog doesn’t seem to offer a button for that. I’ve been looking for a solution on the internet, but wasn’t able to find something. And unfortunately, there is an easy workaround: Just close the second window after startup… The other window will appear again with the next start of Icedove/Thunderbird, but that’s the problem of future-me. These nasty easy workarounds! You won’t fix the problem and it tends to bug you a little harder with every appearance.
Today I had some time to look into the issue.
I sensed the problem in my Thunderbird settings - if that would be an actual Thunderbird issue I would have found something on the internet..
Thus, it must be in my ~/.icedove/XXXX.default directory.
Studying the prefs.js file was quite interesting, but didn’t reveal anything useful for the current issue.
Then I spotted a session.json file, and it turns out that this caused the problem!
It contained these lines: cat session.json | json_pp
{
	"windows" : [
	{
		"type" : "3pane",
		"tabs" : {
			"selectedIndex" : 0,
			"rev" : 0,
			"tabs" : [
			{
				"selectedIndex" : 0,
				"rev" : 0,
				"tabs" : [
				{
					....
				}
				]
			}
			]
		}
	},
	{
		"tabs" : {
			"tabs" : [
			{
				....
			},
			{
				"mode" : "tasks",
				"ext" : {},
				"state" : {
					"background" : true
				}
			},
			{
				"ext" : {},
				"mode" : "calendar",
				"state" : {
					"background" : true
				}
			},
			{
				"state" : {
					"messageURI" : "imap-message://someidentifyer/INBOX#anotheridentifier"
				},
				"mode" : "message",
				"ext" : {}
			}
			],
			"rev" : 0,
			"selectedIndex" : 0
		},
		"type" : "3pane"
	}
	],
	"rev" : 0
}
(For brevity I replaced my actual main tab’s content with ....)
As you see, there is JSON object containing a single key windows with an array of two objects.
These two objects apparently represent my two windows.
Both have tabs.
For example in the second window object my calendar and my tasks are opened in tabs (that’s the lightning/iceowl extension), and a single message occupies another tab.
Brave as I am I just deleted the first window object (I decided for the first one as that had no extra tabs). And voilà! The next launch of Thunderbird just opens a single window! :)
I don’t know who wrote the stuff into the session.json, it was probably caused by one of my extensions.
However, it seems to be stable now.
And if it ever happens again I’ll know how to fix it.
Easy solution, should have fixed that immediately!
Update

I found out what caused the problem: It is FireTray – an extension that I’m using to have a systray notification icon. This extension sits in the systray and changes its icon when a new mail arrives. That’s super useful, but… by default it doesn’t close windows but just hides them to systray! That means you can restore them in the context menu of the systray icon… And that means that the windows aren’t really closed and will appear again with the next start of the application.
To change that behaviour just right-click the icon and click Preferences. A dialog window will pop up and you just need to unselect the Closing window hides to systray. Compare the screenshot. You may also go for Only last window can be hidden.
Generate PDF documents from smartphones, smartwatches, Raspberry Pis, and everywhere..
July 29th, 2016
I recently wanted to create a PDF file with a table of data on a device that did neither have much computational power nor disk space or any other available resources. So what are the options? Installing Word plus various add-ons? Or some Adobe-bloat? Pah.. that’s not even running on big machines…
The best option is of course LaTeX. Generating a tex document is neither storage nor time intensive. But to get proper LaTeX support you need some gigabytes of disk space available and compiling a tex document requires quite some computational time… So basically also no option for all devices..
If there wouldn’t be …
The Network Way
So we could just install the LaTeX dependencies on another, more powerful machine on the network and send our documents there to get it compiled. On that server we would have a web server running that has some scripts to
- accept the tex file,
- store it somewhere temporary,
- execute the
pdflatexcall, - and send back the resulting PDF file.
And that’s exactly what TEXPILE does! It comPILEs laTEX documents on a webserver.
To compile a LaTeX project you just need to throw it as a form-encoded HTTP POST request against the TEXPILE server and the server will reply with the resulting PDF document. If your document project consists of multiple files, for example if you want to embed an image etc, you can create a ZIP file of all files that are necessary to compile the project and send this ZIP via HTTP POST to the TEXPILE server. In that case, however, you also need to tell TEXPILE which of the files in the ZIP container is suppossed to be the root document…
Sounds a bit scary, doesn’t it? PHP? Doing an exec to cal a binary? With user-uploaded data?
If there wouldn’t be …
The Docker Way
This approach wouldn’t be cool if it doesn’t follow the Docker-Hype!
We can put all of that in a Docker image and run a TEXPILE container on whatever machine we have at hand. I already provide a TEXPILE Docker container over there at the Docker Hub. That is, you may run a container where ever you want, you will always get the same result (#reproducibility) and you do not need to worry about attacks (#safe). Even if there is an attacke able to cheat the PHP and pdflatex tools, he will still be jailed in the Docker container that you can easily throw away every once in a while and start a new clean one…
And running a fresh container is really super easy! With docker installed you just need to call the following command:
docker run -it --rm -p 1234:80 binfalse/texpileIt will download the latest version of TEXPILE from the Docker hub (if you do not have it, yet) and run a container of it on your machine. It will also bind port 1234 of your machine to the web server of TEXPILE, so you will be able to talk to TEXPILE at http://your.machine:1234.
Give it a try. Just accessing it with a web browser will show you some help message.
For Example
Single-Document Project
Let’s try an example using curl. Let’s assume your TEXPILE container is running on a machine with the DNS name localhost, and let’s say you forward port 1234 to the HTTP server inside the container. Then you can just send your LaTeX document example.tex as project field of a form-encoded HTTP POST request to TEXPILE:
curl -F project=@example.tex http://localhost:1234 > /tmp/exmaple.pdfHave a look into /tmp/exmaple.pdf to find the PDF version of example.tex.
Multi-Document Project
If you have a project that consists of multiple documents, for example tex files, images, header files, bibliography etc, then you need to ZIP the whole project before you can throw it against TEXPILE. Let’s assume your ZIP container can be found in /tmp/zipfile.zip and the root tex-document in the container is called example.tex. Then you can send the ZIP container as the project field and the root document name as the filename field, as demonstrated in the following call:
curl -F project=@/tmp/zipfile.zip -F filename=example.tex http://localhost:1234 > /tmp/pdffile.pdfIf the root document is not on the top level of the archive, but for example in the somedir directory you need to add the directory name to the filename field. Just to update the filename parameter of the previous call to:
curl -F project=@/tmp/zipfile.zip -F filename=somedir/example.tex http://localhost:1234 > /tmp/pdffile.pdfThe resulting PDF document can then be found in /tmp/pdffile.pdf.
More Examples
The GIT project over at GitHub contains some more examples for different programming languages. It also comes with some sample projects, so you can give it a try without much hassle…
Error Control
Obviously, the compilation may fail. Everyone who’s every been working with LaTeX knows that. You may have an error in your tex code, or the file-upload failed, or TEXPILE’s disk ran out of space, or…
Good news is that TEXPILE was developed with these problems in mind. TEXPILE will give you a hint on what happened in its HTTP status code. Only if everything was fine and the compilation was succesfull you’ll get a 2XX status code. In this case you can expect to find a proper PDF document in TEXPILE’s response
If there was an error at any point you’ll either get a 4xx status code or a 5xx status code in return. In case of an error TEXPILE of course cannot return a PDF document, but it will return an HTML document with the detailed error.
Depending on how far it has come with it’s job, you’ll find some error messages on the upload, or on missing parameters, and if the LaTeX compilation faile you’ll even get the whole output from the pdflatex command! A lot of information that will help you debug the actual problem.
Summary
Using TEXPILE it is super easy to generate PDF document from every device with network access. You can for example export some sensor data as a nice table from your smartwatch, or some medic information as graphs and formulas from you fitbit, or create tikz-images on a raspberry pi, you can even instantly generate new versions of an EULA on your google glasses…
TEXPILE is free software and I am always super-happy when people contribute to open tools! Thus, go ahead and
- Send comments, issues, and feature requests by creating a new ticket
- Spread the tool: Tell your friends, share your thoughts in your blog, etc.
- Propose new modifications: fork the repo – add your changes – send a pull request
- Contribute more example code for other languages
No matter if it’s actual code extensions, more examples, bug fixes, typo corrections, artwork/icons: Everything is welcome!!
Eventually learning how to wield PAM
July 16th, 2016PAM. The Pluggable Authentication Modules. I’m pretty sure you heard of it. It sits in its /etc/pam.d/ and does a very good job. Reliable and performant, as my guts tend to tell me.
Unless… You want something specific! In my case that always implied a lot of trial and error. Copying snippets from the internet and moving lines up and down and between different PAM config files. So far, I managed to conquer that combinatorial problem in less time than I would need to learn PAM - always with bad feeling because I don’t know what I’ve been doing with the f*cking sensible auth system…
But this time PAM drives me nuts. I want to authenticate users via the default *nix passwd as well as using an LDAP server -AND- pam_mount should mount something special for every LDAP user. The trial and error method gave me two versions of the config that works for one of the tasks, but I’m unable to find a working config for both. So… Let’s learn PAM.
The PAM
On linux systems, PAM lives in /etc/pam.d/. There are several config files for differen purposes. You may change them and they will have effect immediately – no need to restart anything.
PAM allows for what they call “stacking” of modules: Every configuration file defines a stack of modules that are relevant for the authentication for an application. Every line in a config file containes three tokens:
- the realm is the first word in a line; it is either auth, account, password or session
- he control determines what PAM should do if the module either succeeds/fails
- the module the actual module that gets invoked and optionally some module parameters
Realms
There are four different realms:
- auth: checks that the user is who he claims to be; usually password base
- account: account verification functionality; for example checking group membership, account expiration, time of day if a user only has part-time access, and whether a user account is local or remote
- password: needed for updating passwords for a given service; may involve e.g. dictionary checking
- session: stuff to setup or cleanup a service for a given user; e.g. launching system-wide init script, performing special logging, or configuring SSO
Controls
In most cases the controls consist of a single keyword that tells PAM what to do if the corresponding module either succeeds or fails. You need to understand, that this just controls the PAM library, the actual module neither knows not cares about it. The four typical keywords are:
- required: if a ‘required’ module is not successful, the operation will ultimately fail. BUT only after the modules below are done! That is because an attacker shouldn’t know which or when a module fails. So all modules will be invoked even if the first on fails, giving less information to the bad guys. Just note, that a single failure of a ‘required’ module will cause the whole thing to fail, even if everything else succeeds.
- requisite: similar to required, but the whole thing will fail immediately and the following modules won’t be invoked.
- sufficient: a successful ‘sufficient’ module is enough to satisfy the requirements in that realm. That means, the following ‘sufficient’ won’t be invoked! However, sufficient modules are only sufficient, that means (i) they may fail but the realm may still be satisfied by something else, and (ii) they may all succeed but the realm may fail because a required module failed.
- optional: optional modules are non-critical, they may succeed or fail, PAM actually doesn’t care. PAM only cares if there are exclusively optional modules in a particular stack. In that case at least one of them needs to succeed.
Modules
The last token of every line lists the path to the module that will be invoked. You may point to the module using an absolute path starting with / or a path relative from PAMs search directories. The search path depends on the system your working on, e.g. for Debian it is /lib/security/ or /lib64/security/. You may also pass arguments to the module, common arguments include for example use_first_pass which provides the password of an earlier module in the stack, so the users doesn’t need to enter their password again (e.g. useful when mounting an encrypted device that uses the same password as the user account).
There are dozens of modules available, every module supporting different options. Let me just forward you to a PAM modules overview at linux-pam.org. and an O’Reilly article on useful PAM modules.
That’s it
Yeah, reading and writing about it helped me fixing my problem. This article is probably just one within a hundred, so if it didn’t help you I’d like to send you to one of the following. Try reading them, if that doesn’t help write a blog post about it ;-)
Further Resources
- Centos documents on PAM, including writing of PAM modules
- The Linux-PAM Guides
- O’Reilly’s Introduction to PAM
- The Linux-PAM System Administrators’ Guide
Modify a linux LiveOS
July 8th, 2016By default I’m using GRML when I need a live operating system. I installed it to one of my USB pen drives and (almost) always carry it with me. GRML already has most of the essential and nice-to-have tools installed and it’s super compfortable when the shit has hit the fan!
The Problem
However, there are circumstances when you need something that’s not available on the base image. That entails a bit annoying work. For example if you need to install package XXX you need to
- run
aptitude install XXX - recognize that the package lists are super out-dated…
- call
aptitude update - recognize you’re missing the latest GPG key that was used to sign the packages
- run a
gpg --keyserver keys.gnupg.net --recv YYYfollowed by agpg --export YYY | sudo apt-key add - - run
aptitude install XXXagain to get the package
And that’s actually really annoying if you nedd XXX often. You’ll wish to have XXX in the base system! But how to get it there?
Update the ISO image
The following will be based on GRML. I assume that your USB pen drive will be recognized as /dev/sdX and the partition you (will) have created is /dev/sdX1. The following also requires syslinux to be installed:
aptitude install syslinuxInstall the original Image to your Pen Drive
To modify an image you first need the image. So go to grml.org/download/ and download the latest version of the image. At the time of writing this article it is Grml 2014.11 (Gschistigschasti). You see it’s a bit outdated, wich also explains this article ;-)
To install it on a pen drive you need a pen drive. It should have a partition with a bootable flag. Use, eg., fdisk or gparted.
This partition should have a FAT partition on it. If your not using the UI of gparted this is the way to go (assuming /dev/sdX1 is the partition you created):
mkfs.fat -F32 -v -I -n "LIVE" /dev/sdX1Then you need to install syslinux’ MBR onto the pen drive:
dd if=/usr/lib/syslinux/mbr/mbr.bin of=/dev/sdXMount both, the ISO (/tmp/grml96-full_2014.11.iso) and the pen drive (/dev/sdX1) to copy all files from the ISO onto the pen drive:
mkdir -p /mnt/mountain/{iso,usb}
mount /dev/sdX1 /mnt/mountain/usb
mount -o loop,ro -t iso9660 /tmp/grml96-full_2014.11.iso /mnt/mountain/iso
rsync -av /mnt/mountain/iso/* /mnt/mountain/usb/
If you now have a look into the /mnt/mountain/usb/ directory you will see the GRML live image structure. However, you won’t be able to boot – you still need a proper bootloader.
Fortunately, the syslinux tool is able to install it to your pen drive:
syslinux /dev/sdX1The syslinux bootloader still need some configuration, but GRML alreay contains them. Just copy them from the USB’s/boot/isolinux/ into the root of the pen drive:
cp /mnt/mountain/usb/boot/isolinux/* /mnt/mountain/usbExcellent! Unmount the pendrive an try to boot from it, to make sure it’s properly booting the GRML operating system:
umount /mnt/mountain/iso/ /mnt/mountain/usb/ && syncUnderstand what happens
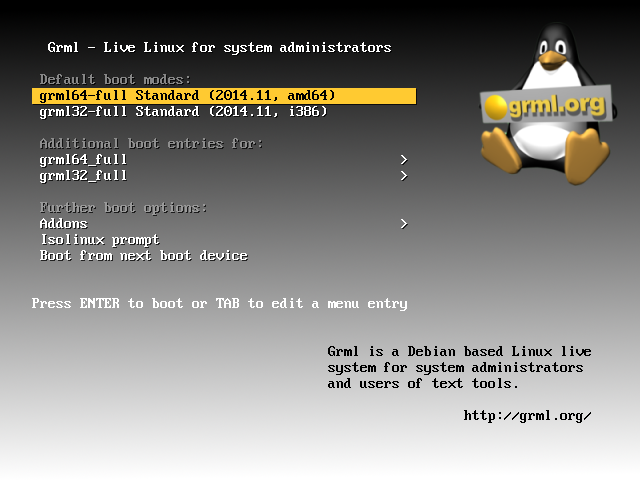
Ok, if that was successful you’re mashine will boot into the GRML splash screen (see Figure) and you can choose between the 64bit and the 32bit version (and some more specific boot options). Clicking either of them will mount a read-only file system from the pen drive as a read-write file system into your RAM. Afterwards it will boot from that sytem in the RAM.
The file system that’s written to the memory can be found in live/grml64-full/grml64-full.squashfs (or /mnt/mountain/usb/live/grml32-full/grml32-full.squashfs for 32bit systems).
It’s a squashfs, see wikipedia on SquashFS.
Modify the Base Image
So let’s go and modify the system.
You probably alreay guess it: We need to update the grml64-full.squashfs and integrate the desired changes.
As I said, the image of the file system can be found in /live/grml64-full/grml64-full.squashfs and /live/grml32-full/grml32-full.squashfs of the USB’s root.
In the following I will just use the 64bit version in /live/grml64-full/grml64-full.squashfs, but it can be applied to the 32bit version euqivalently – just update the paths.
As the SquashFS is read-only you need to mount it and copy all the data to a location on a read-write file system.
To copy the stuff preserving all attributes I recommend using the rsync tool.
Let’s assume your pen drive is again mounted to /mnt/mountain/usb and /storage/modified-livecd is mounted as RW:
mount /mnt/mountain/usb/live/grml64-full/grml64-full.squashfs /mnt/mountain/iso -t squashfs -o loop
rsync -av /mnt/mountain/iso/* /storage/modified-livecd/
Now you have your system read-write in /storage/modified-livecd. Go ahead and modify it! For example, create a new file:
echo "this was not here before" > /storage/modified-livecd/NEWFILEThen you just need to delete the original SquashFS file and repack the new version onto the pen drive:
rm /mnt/mountain/usb/live/grml64-full/grml64-full.squashfs
mksquashfs /storage/modified-livecd /mnt/mountain/usb/live/grml64-full/grml64-full.squashfs
Voilà… Just boot from the pen drive and find your modified live image :)
Of course you can also chroot into /storage/modified-livecd to e.g. install packages and modify it from inside…
For those not familiar with chrooting: [Wikipedia comes with a good example on how to chroot.](https://en.wikipedia.org/wiki/Chroot#Linux_host_kernel_virtual_file_systems_and_configuration_files
So… Conclusion?
Yeah, it’s not that hard to modify the system, but it takes some manual steps. And if you plan to do it more often you need to think about infrastructure etc. Thus, this is probably just applicable for hard-core users – but those will love it ;-)
PHP file transfer: Forget the @ - use `curl_file_create`
June 21st, 2016I just struggled uploading a file with PHP cURL. Basically, sending HTTP POST data is pretty easy. And to send a file you just needed to prefix it with an at sign (@). Adapted from the most cited example:
<?php
$target_url = 'http://server.tld/';

$post = array (
    'extra_info' => '123456',
    'file_contents' => '@' . realpath ('./sample.jpeg');
    );

$ch = curl_init ($target_url);
curl_setopt ($ch, CURLOPT_POST, 1);
curl_setopt ($ch, CURLOPT_POSTFIELDS, $post);
curl_setopt ($ch, CURLOPT_RETURNTRANSFER, 1);
$result=curl_exec ($ch);
curl_close ($ch);
?>
You see, if you add an ‘@’ sign as the first character of a post field the content will be interpreted as a file name and will be replaced by the file’s content.
At least, that is how it used to be… And how most of the examples out there show you.
However, they changed the behaviour. They recognised that this is obviously inconvenient, insecure and error prone. You cannot send POST data that starts with an @ and you always need to sanitise user-data before sending it, as it otherwise may send the contents of files on your server. And, thus, they changed that behaviour in version 5.6, see the RFC.
That means by default the @/some/filename.ext won’t be recognized as a file – PHP cURL will literally send the @ and the filename (@/some/filename.ext) instead of the content of that file. Took ma a while and some tcpdumping to figure that out..
Instead, they introduced a new function called curl_file_create that will create a proper CURLFile object for you. Thus, you should update the above snippet with the following:
<?php
$target_url = 'http://server.tld/';

$post = array (
    'extra_info' => '123456',
    'file_contents' => curl_file_create ('./sample.jpeg');
    );

$ch = curl_init ($target_url);
curl_setopt ($ch, CURLOPT_POST, 1);
curl_setopt ($ch, CURLOPT_POSTFIELDS, $post);
curl_setopt ($ch, CURLOPT_RETURNTRANSFER, 1);
$result=curl_exec ($ch);
curl_close ($ch);
?>
Note that the contents of the file_contents field of the $post data differs.
The php.net manual for the file_contents function is unfortunatelly not very verbose, but the RFC on wiki.php.net tells you a bit more about the new function:
<?php
/**
 * Create CURLFile object
 * @param string $name File name
 * @param string $mimetype Mime type, optional
 * @param string $postfilename Post filename, defaults to actual filename
 */
function curl_file_create($name, $mimetype = '', $postfilename = '')
{}
?>
So you can also define a mime type and some file name that will be sent.
That of course makes it a bit tricky to develop for different platforms, as you want your code to be valid on both PHP 5.4 and PHP 5.6 etc. Therefore you could introduce the following as a fallback:
<?php
if (!function_exists('curl_file_create'))
{
	function curl_file_create($filename, $mimetype = '', $postname = '')
	{
		return "@$filename;filename="
			. ($postname ?: basename($filename))
			. ($mimetype ? ";type=$mimetype" : '');
	}
}
?>
as suggested by mipa on php.net. This creates a dummy function that is compliant with the old behaviour if there is no curl_file_create, yet.